Building a Todo List MCP Server

30 min read
Photo Credit: Allison & Rupert PhotographyIntroduction
MCP servers give us a way to give context to an LLM, we provide tools, resources, prompts to the LLM through the MCP interface that it can use to complete actions on our behalf. In this tutorial we will be building a simple MCP CRUD application, but you could use it for anything really. If you would like to learn more than have a look at the resources below.
This tutorial is going to be super short and simple and we will building the following:
• Server (Think nodeJS, it feels similar)
• Tools (CRUD API handler for your LLM to use)
• Database (For storing our Todo’s)
Project Setup
First up, lets install the required packages and set up our project.
1mkdir todo-mcp && cd todo-mcp
2npm init -y
3npm install @modelcontextprotocol/sdk @prisma/client
4npm install --save-dev @types/node prisma tsx typescript
5code .
Once that’s done, open up your package.json file and just make sure it looks like mine below.
Notice we have an inspect command, this downloads and install the MCP inspector which is what you can use locally to ensure your MCP server tools, resources etc are doing what they should be doing before packaging it up to use with Claude or some other LLM client.
1{
2  "name": "todo-mcp",
3  "version": "1.0.0",
4  "main": "index.ts",
5  "type": "module",
6  "bin": {
7    "todo-mcp": "./build/index.js"
8  },
9  "scripts": {
10    "test": "echo \"Error: no test specified\" && exit 1",
11    "build": "tsc && chmod 755 build/index.js",
12    "inspect": "npm run build && npx @modelcontextprotocol/inspector node build/index.js"
13  },
14  "keywords": [],
15  "author": "",
16  "license": "ISC",
17  "description": "",
18  "dependencies": {
19    "@modelcontextprotocol/sdk": "^1.13.0",
20    "@prisma/client": "^6.10.1"
21  },
22  "devDependencies": {
23    "@types/node": "^24.0.3",
24    "prisma": "^6.10.1",
25    "tsx": "^4.20.3",
26    "typescript": "^5.8.3"
27  },
28  "files": [
29    "build"
30  ]
31}
32
Setting up the Database
I won’t go into too much detail but Prisma is a DB ORM that makes it super easy to work with databases and manage migrations, highly recommended.
1npx prisma init --datasource-provider sqlite --output ../generated/prismaNext, in your schema.prisma file, add the following schema.
1generator client {
2  provider = "prisma-client-js"
3  output   = "../generated/prisma"
4}
5
6datasource db {
7  provider = "sqlite"
8  url      = env("DATABASE_URL")
9}
10
11model Todo {
12  id        Int     @id @default(autoincrement())
13  title     String
14  content   String?
15  createdAt DateTime @default(now())
16}
Then just run a quick migration, and you should be all setup.
1npx prisma migrate dev --name initCreating the Server
In your root directory create a src folder and an index.ts and tools.ts file.
1mkdir src && cd src
2touch index.ts
3touch tools.ts
Our server will be in our index.ts file. At the top of the file we will add our imports.
1import { McpServer } from "@modelcontextprotocol/sdk/server/mcp.js";
2import { StdioServerTransport } from "@modelcontextprotocol/sdk/server/stdio.js";
3import { PrismaClient } from "../generated/prisma/index.js";
4// import { initializeTools } from "./tools.js"; // We will uncomment this in the next step
Then we can add our server details.
1export class TodoListMCP {
2  db: PrismaClient;
3  server = new McpServer(
4    {
5      name: "@{your-handle}/todo-server",
6      version: "1.0.0",
7      capabilities: { // These are mandatory and you enter empty {}
8        transports: {
9          stdio: {},
10        },
11        tools: {},
12      },
13    },
14    {
15      instructions: "Lets you manage your todo list",
16    }
17  );
18  constructor(db: PrismaClient) {
19    this.db = db;
20  }
21  async init() {
22    // initializeTools(this); // We will uncomment this in the next step
23    console.error("TodoListMCP initialized"); // MCP uses console.log under the hood, so we use .error as to not override it
24  }
25}
26
27const db = new PrismaClient(); // Create our DB client
28
29async function main() {
30  const agent = new TodoListMCP(db); // Creating the MCP server agent
31  await agent.init(); // Initialise the tools, resources, prompts etc
32  const transport = new StdioServerTransport(); // We are using STDIO as our transport method, more information:
33	//   https://modelcontextprotocol.io/docs/concepts/transports
34  await agent.server.connect(transport);
35  console.error("TodoListMCP Server is running...");
36}
37
38main().catch((err) => { // Basic error handling etc
39  db.$disconnect();
40
41  console.error("Error starting server:", err);
42  process.exit(1);
43});
Before we create our tools, lets just make sure the server is connecting correctly.
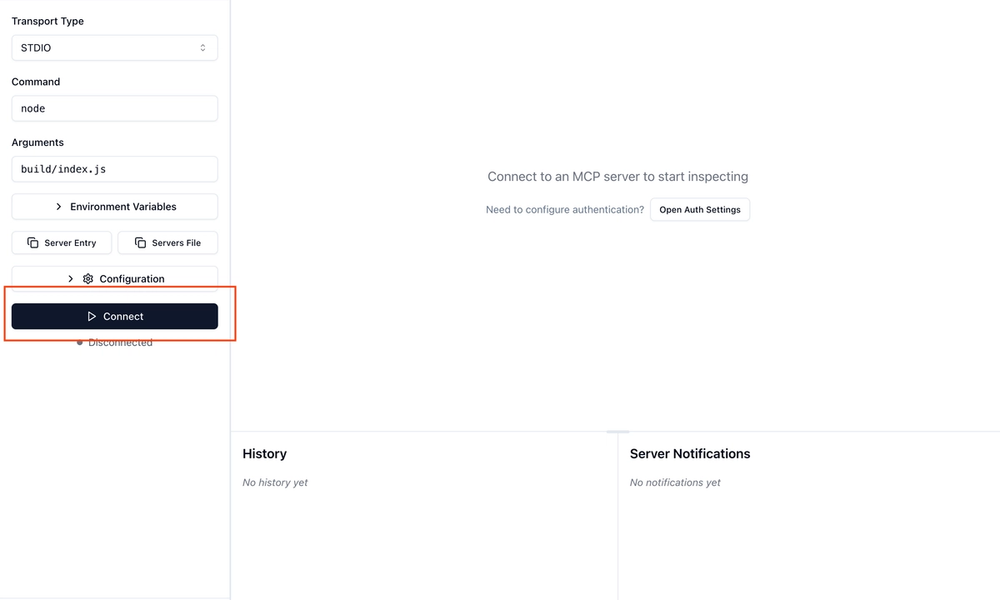
1npm run inspectOpen up the link in the terminal under Open inspector with token pre-filled: You should see the following page in localhost.
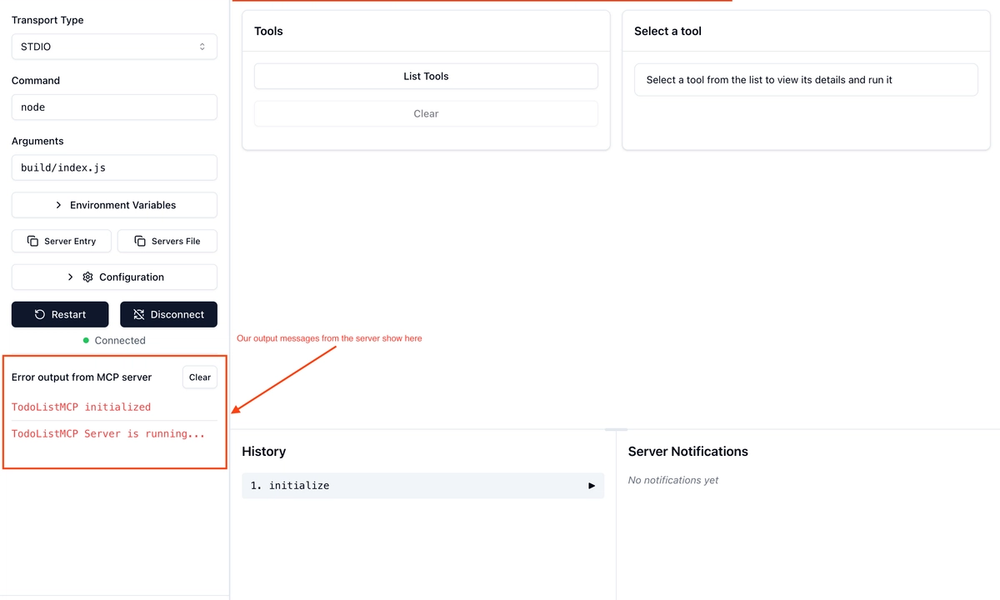
Next, click Connect, You should see the page below
Note: The tools will still be unavailable to you and that’s all good! We will be handling that in the next step.
Great, let’s create some tools for our LLM to use.
Creating Tools
Open up the tools.ts file you created earlier, first add the required imports and basic scaffolding.
1import { type TodoListMCP } from "./index.js";
2import { z } from "zod";
3
4export const initializeTools = (agent: TodoListMCP) => {};
5
You are now free to uncomment the initializeTools code in the index.ts file.
In the initialize tools function, register a tool.
1  agent.server.registerTool(
2    "addTodo", // This the LLM facing title
3    {
4      title: "Add Todo", // User facing title
5      description: "Add an item to the todo list", // LLM & User facing description
6      inputSchema: { title: z.string(), content: z.string() }, // required args, MCP uses Zod by default
7    },
8    async ({ title, content }: { title: string, content: string }) => { // The function for the LLM to use with our args
9      const newTodo = await agent.db.todo.create({ // Content here could be anything, could be a call to a DB, another MCP server, or just some complex calculation
10        data: {
11          title,
12          content,
13        },
14      });
15      return {
16        content: [
17          {
18            type: "text",
19            text: `Todo item added with ID: ${newTodo.id}`, // Just to let us know it was created successfully
20          },
21        ],
22      };
23    }
24  );
So now, theoretically our LLM can create todo list items on our behalf using the structured input and outputs above. I hope you’re starting to see just how easy this is and the power you have to create these tools.
Before we add the rest of the tools, lets just make sure it’s running correctly.
1// Stop the current server first (ctrl c)
2// Restart the server
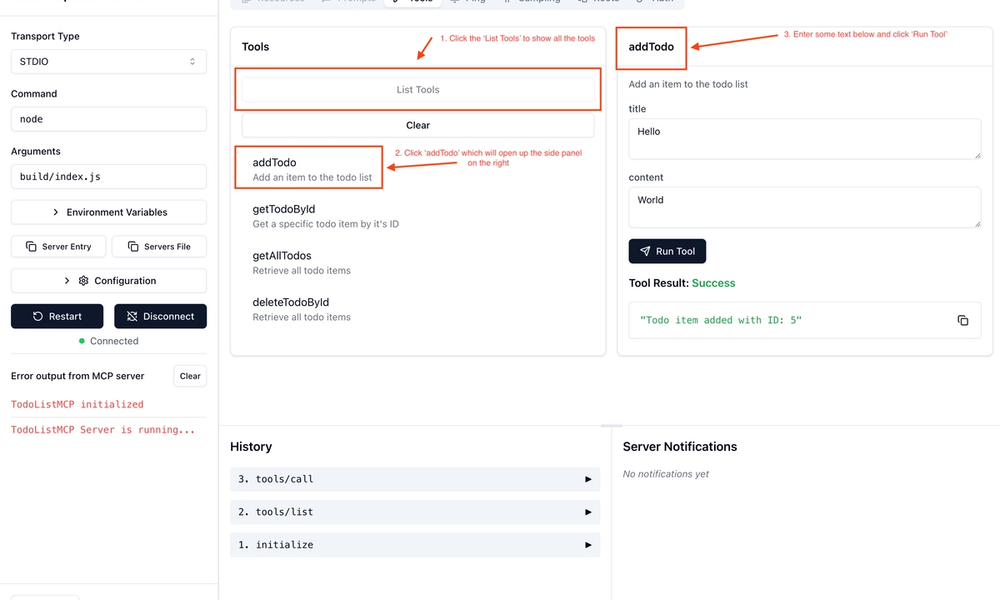
3npm run inspect• Click ‘List Tools’ to see the addTodo tool you just created, the others you see below we will add in the next step.
• Click on the ‘addTodo’ tool you just created which will open the side panel on the right.
• Enter some text for our first todo item and ‘Run Tool’.
• It should return the ‘Success’ message you see below.
Now we will quickly add some extra tools, feel free to test them in your inspector above before moving on.
1  agent.server.registerTool(
2    "getTodoById",
3    {
4      title: "Get Todo By ID",
5      description: "Get a specific todo item by it's ID",
6      inputSchema: { id: z.number() },
7    },
8    async ({ id }: any) => {
9      const foundTodo = await agent.db.todo.findFirst(id);
10      return {
11        content: [
12          {
13            type: "text",
14            text: JSON.stringify(foundTodo, null, 2),
15          },
16        ],
17      };
18    }
19  );
20
21  agent.server.registerTool(
22    "getAllTodos",
23    {
24      title: "Get All Todos",
25      description: "Retrieve all todo items",
26    },
27    async () => {
28      const todos = await agent.db.todo.findMany();
29      return {
30        content: [
31          {
32            type: "text",
33            text: JSON.stringify(todos, null, 2),
34          },
35        ],
36      };
37    }
38  );
39
40  agent.server.registerTool(
41    "deleteTodoById",
42    {
43      title: "Delete Todo By ID",
44      description: "Delete a specific todo item by it's ID",
45      inputSchema: { id: z.number() },
46    },
47    async ({ id }) => {
48      const todos = await agent.db.todo.delete({
49        where: { id },
50      });
51      return {
52        content: [
53          {
54            type: "text",
55            text: JSON.stringify(todos, null, 2),
56          },
57        ],
58      };
59    }
60  );
Cool, now let’s make this MCP server actually useful!
Using Our MCP Server
For this demo I will be using Claude Desktop, but MCP has a tutorial on creating your own LLM client if you wish.
Open up the Claude desktop config file.
1code ~/Library/Application\ Support/Claude/claude_desktop_config.jsonAdd our new server, make sure to add the full path your todo MCP server.
1{
2  "mcpServers": {
3    "todo-mcp": {
4      "command": "node",
5      "args": [
6        "{your-path-goes-here}/todo-mcp/build/index.js"
7      ]
8    }
9  }
10}
11
Open up Claude Desktop
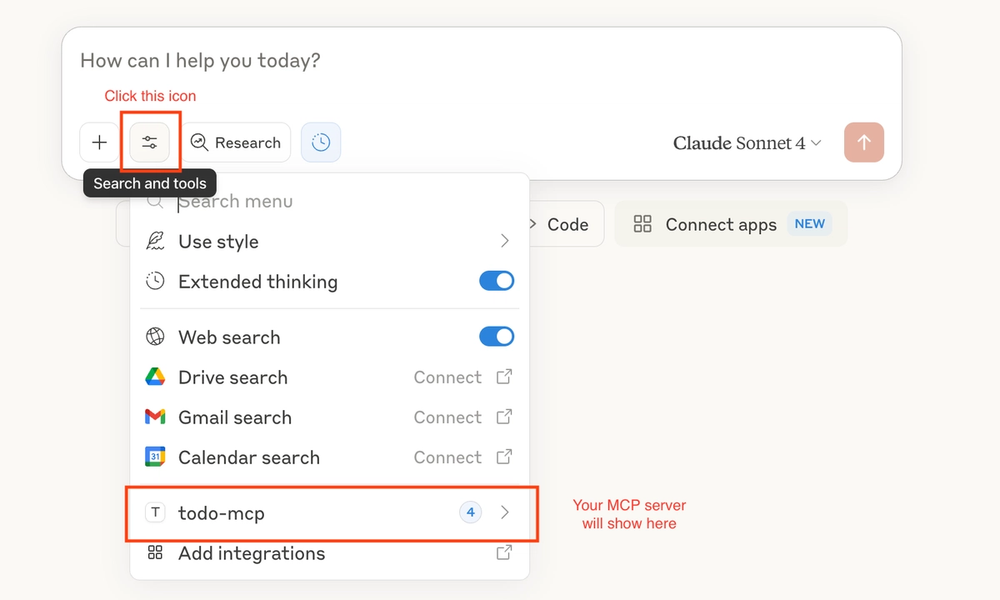
• Click the tools icon
• Your MCP server should show up near the bottom. The number 4 shows the number of connected tools. Clicking it will let you manually select a tool to use, but we want Claude to do that for us.
Create your first todo item, it’s kind of fun to see how vague I can be and see if it still recognises that I want to create a todo item.
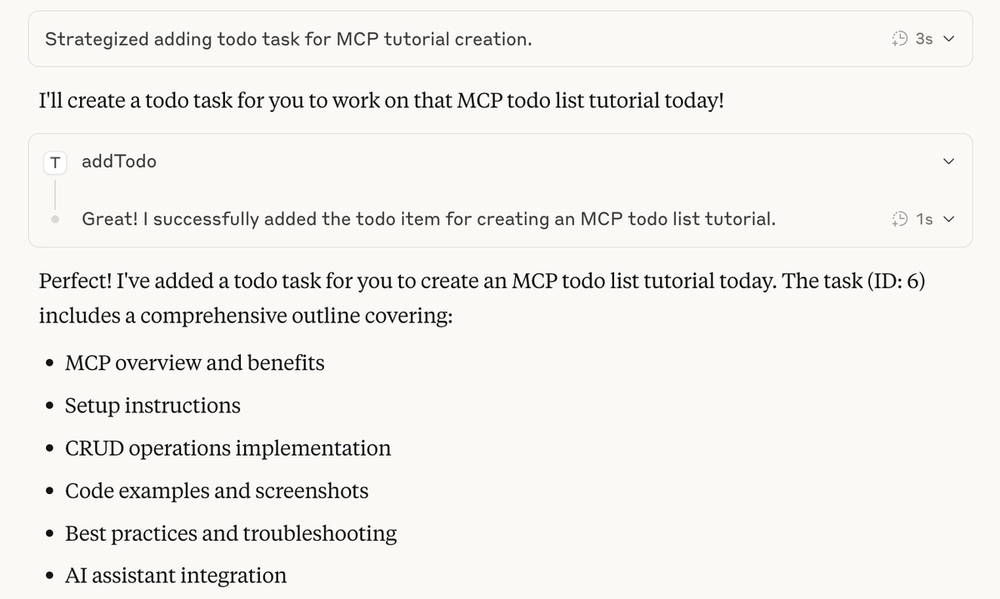
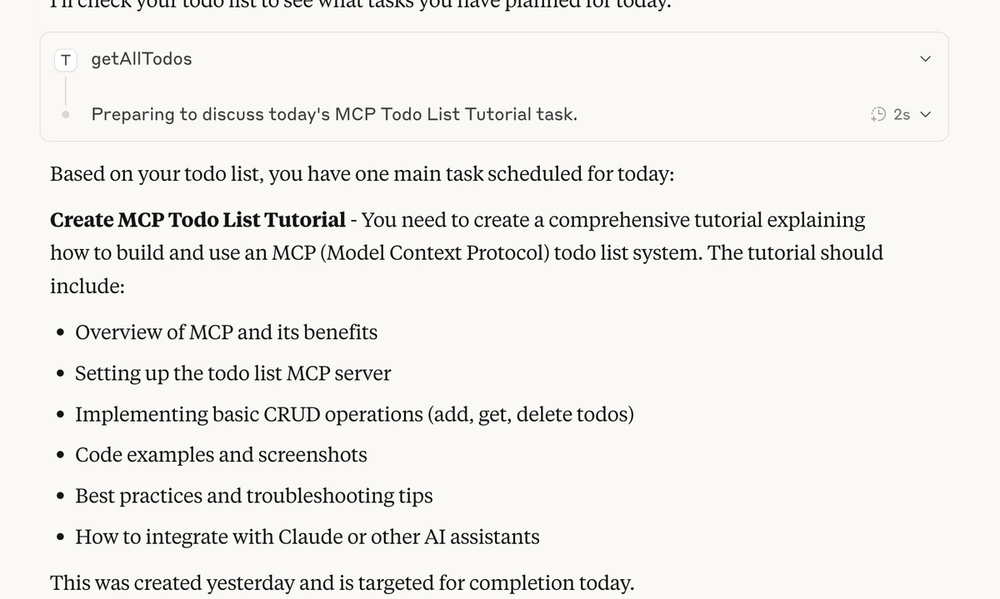
Now when I log into Claude desktop I just need to ask the following below and it gives me my list of what I need to do.
I hope this tutorial has shown you just how easy it is to create your own MCP servers, this one was the classic Todo-App problem, but I’ve used MCP servers to solve all sorts of real world problems. This is obviously just the tip of the iceburg here so I’d recommend looking into resources, prompts and sampling (I may create another tutorial covering these soon). It really does solve the AI context problem fairly well.
Thanks so much for doing this tutorial with me, I hope you had as much fun as I did when I put it together.

I am a developer from New Zealand who loves building web applications, websites and mobile apps and getting outdoors.